
Easier Installation of the RapidiConnector
We are pleased to announce a new version of the RapidiConnector - it is now a lot easier to install and setup the RapidiConnector and establish connections to your local systems. Please read on to learn more.
Our aim with this release has been to make this process as easy and straighforward as possible and at the same time ensuring that the RapidiConnector can run under a normal Windows user account.
The changes that we have made are all related to the above goal and the feedback that we have got so far has been very positive.
RapidiConnector installation and setup
The installation and setup of the RapidiConnector is done in two steps: First, you download and run the RapidiConnector MSI (Windows installation file). This will install the RapidiConnector files in a new directory (in general in C:\Program Files\RapidiConnector) and create menu items and a shortcut icon on the Desktop (if selected). Second, you run the RapidiConnector Service Controller to set up the RapidiConnector service(s) needed.
RapidiConnector Service Controller
After running the RapidiConnector MSI file (as Administrator), you start the RapidiConnector Service Controller (right-click and select 'Run as administrator'). In the Service Controller, there is a button to install a new RapidiConnector service. Clicking this button will open up a new window (see image below). You need to fill in the details and the controller will handle the rest for you - including creating a sub-directory and copy the needed files in there, setting up the windows service with proper naming and description, assigning proper rights to the selected Windows user to run the service and have access to the directory where the files are installed. After this, you can directly start the service and all should work fine.
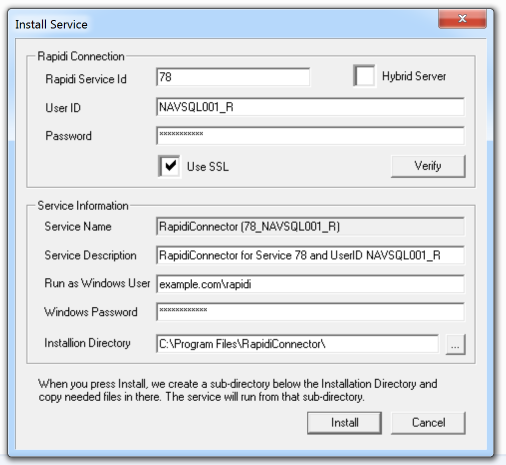 image 1: example of installation of the RapidiConnector
To achieve this smooth installation process we have made a number of changes to both the RapidiConnector and the RapidiConnector Service Controller. Below you have a more detailed list:
-
We have been through all error situations that you can normally encounter and ensured that you get a good and descriptive error message and instructions on how to correct the problem.
-
We have ensured that when accessing the Windows Registry we only require Read access (if we do not need to write to the Registry). In this way, a Standard user can now run the RapidiConnector without any special rights to the Registry.
-
We now store the PWEncryptKey (the key to encrypt/decrypt passwords) in HKEY_CURRENT_USER/Software/RapidiOnline/RapidiConnector instead of HKEY_LOCAL_MACHINE/Software/RapidiOnline/RapidiConnector. This ensures that a Standard Windows user can both read and save/write this key without being forced to add any special rights.
-
During the installation, we now save the installation directory to the Registry (in HKEY_CURRENT_USER/Software/RapidiOnline/RapidiConnector) to be able to use this information and automatically suggest the correct installation directory when installing a new Service. Before you had to browse the computer to find the correct installation directory each time.
-
When Installing a new Service, the Service Controller will now automatically ensure that the Windows user who is selected to run the Service, is given Start/Stop Service access to the specific Windows service. It will also ensure that the Windows user is given the right to 'Log on as a Service' and the right to fully access the directory where the Service is setup to run.
The above mentioned rights correspond to the minimum access needed for a Standard Windows user to successfully run the RapidiConnector.
-
The default is now to install the 64-bit version of the RapidiConnector which will be the right choice for almost all situations. The only situation where you should install the 32-bit version is if you for example need to connect to an old MS Dynamics NAV system via C/Front. The 32-bit version is installed to C:\Program Files (x86)\RapidiConnector and can co-exist with the 64-bit version. You can have both 32-bit and 64-bit RapidiConnectors running on the same computer.
-
In this new version we provide more information like the computer name and Windows service name for each RapidiConnector that you have running. The information is visible using the 'Get Status' button on the Dashboard. This makes it much easier to identify each service that is running.
-
Normally the RapidiConnector will automatically get the correct/current Rapidi server IP address and Port number (using a HTTP SOAP API request to api.myrapidi.com on port 80) and use this information to connect to the server. You can, however, skip the SOAP request by entering both the Server Connect (IP address) and Port number under Parameters for the service (after the install). Earlier you also had to set the Rapidi Service Id to 0, but this is not needed anymore. It is not recommended to set the Server Connect IP address and Port number manually as the information might become outdated as we sometimes move Central Services to other servers to optimize and reduce the load on the servers.
-
The RapidiConnector Service Controller is now also able to install our Hybrid Service version. We will have more information about our Hybrid Service option in a later blog post. So, please stay tuned for that :)
Upgrading the RapidiConnector
To upgrade an existing RapidiConnector installation, we recommend the following procedure:
- stop all existing RapidiConnector services (note down what you have running)
- uninstall each RapidiConnector service using the current RapidiConnector Service Controller
- uninstall the currently installed RapidiConnector
- download and install the new RapidiConnector MSI (find it under 'Connections' in MyRapidi.com)
- install each needed RapidiConnector service (find the parameters needed under each Connection in MyRapidi.com)
The new version is 4.0.01d. You should coordinate the upgrade of your RapidiConnector(s) with RapidiOnline Support. Ask our Support to upgrade your Central Service at the same time.
Please contact support to arrange this upgrade