
MS Dynamics NAV Sales Order Using Web Services Made Simple

New feature: Create MS Dynamics NAV Sales Orders in one step (one transfer)
When you want to create new Sales Orders in MS Dynamics NAV the obvious choice is to publish the standard Sales Order Page (Page 42) as a Web service and use this Web service to insert the new Sales Orders in NAV.
Main Benefits & Advantages:
- you use the same interface as when manually entering the Sales Orders into NAV - i.e. the same checks and code are running in the background
- you don't need to add any new code (no programming needed)
- your custom fields and custom code is running just like when Sales Orders are entered manually
Disadvantage: Three Web service calls required to create a new Sales Order
However, there is also one major disadvantage to this (at least until now): The standard Sales Order Page Web service does not allow you to specify header and lines and send everything to the server in one call.
In fact you need three Web service calls to create a complete new Sales Order:
- in the first call you create an empty header
- then you update this header with e.g. Customer No etc. and create some empty lines
- and then in the third call you can finally update the lines with e.g. Item No and Quantity and now you have a complete Sales Order in MS Dynamics NAV
Time for a better solution
In RapidiOnline we accomplish creating a NAV Sales Order with at least four different Transfers and a number of extra fields in both MS Dynamics NAV and e.g. Salesforce.com or MS Dynamics CRM to control the state of the data transfer. It was always a bit of a hassle to get this running and tested in our implementations and we were hoping that Microsoft would come up with a better solution to this problem. However, even in the latest MS Dynamics NAV 2016 it is still working exactly the same way, therefore it was time to do come up with a better solution.
The Simple New Way
We have now built in special support for Sales Order creation into our MS Dynamics NAV Web Service Connector. RapidiOnline will now recognise that you want to create a new Sales Order in MS Dynamics NAV and from just one single Transfer, where you map both header and lines with all the needed fields, the Connector will do the above listed three steps and create a new complete Sales Order in MS Dynamics NAV!
This is even very simple to use - you just map all fields needed on both header and sub-transfer for the lines and specify "Add" and "Disable Destination Lookup" on both main and sub-transfer, then it works.
See the below screen shots for further explanation.
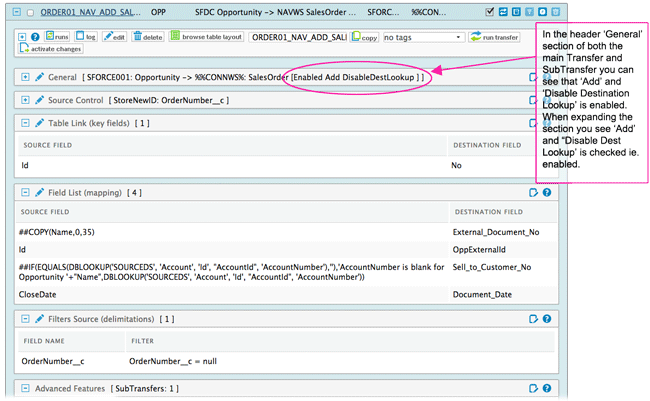
Image 1: Example of Sales Order Transfer that automatically writes the new Sales Order number back to the source system.
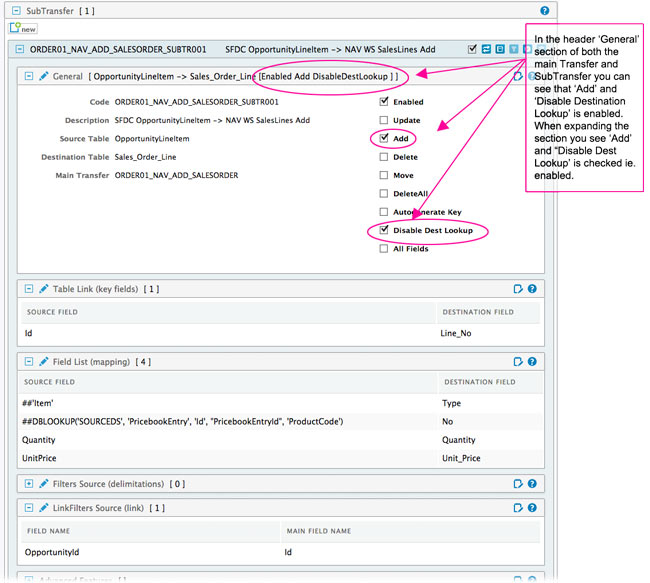
Image 2: Example of SubTransfer of the Sales Order
Further explanation
The functionality is triggered by the names of the objects - by default we support "SalesOrder" and "Sales_Order_Line" but this can be specified in the local rapidi.cfg file by adding the parameter NavWSEnableAutoCreate (e.g. NavWSEnableAutoCreate : SalesOrder#Sales_Order_Line). You can add the names for creating Purchase Orders or other header/line Pages if you wish.
To use this feature, you need to upgrade both central service and local RapidiConnector to version 3.2.92u or later. Please contact our support by submitting a case to arrange an upgrade.
